由于JOS实验的每个部分都很大,所以把它们分开来写,目标小的时候可以更关注一些细节。
JOS实验1的第二个部分是Boot Loader,Exercise3本来也应该是这个部分的,懒得去改了,就这样吧。
练习4:熟悉指针
Exercise 4. Read about programming with pointers in C. The best reference for the C language is The C Programming Language by Brian Kernighan and Dennis Ritchie (known as ‘K&R’). We recommend that students purchase this book (here is an Amazon Link) or find one of MIT’s 7 copies.
Read 5.1 (Pointers and Addresses) through 5.5 (Character Pointers and Functions) in K&R. Then download the code for pointers.c, run it, and make sure you understand where all of the printed values come from. In particular, make sure you understand where the pointer addresses in lines 1 and 6 come from, how all the values in lines 2 through 4 get there, and why the values printed in line 5 are seemingly corrupted.
There are other references on pointers in C (e.g., A tutorial by Ted Jensen that cites K&R heavily), though not as strongly recommended.
Warning: Unless you are already thoroughly versed in C, do not skip or even skim this reading exercise. If you do not really understand pointers in C, you will suffer untold pain and misery in subsequent labs, and then eventually come to understand them the hard way. Trust us; you don’t want to find out what “the hard way” is.
练习4的内容,就是好好读一下K&R的《The C Programming Language》的指针部分5.1~5.5,不然后面会很痛苦。
读完后,理解一下pointer.c这个文件。
在看看ELF的内容。
练习5:链接地址的理解
Exercise 5. Trace through the first few instructions of the boot loader again and identify the first instruction that would “break” or otherwise do the wrong thing if you were to get the boot loader’s link address wrong. Then change the link address in boot/Makefrag to something wrong, run make clean, recompile the lab with make, and trace into the boot loader again to see what happens. Don’t forget to change the link address back and make clean again afterward!
这个练习主要是对链接的理解,跟踪boot loader初始的几条指令,找出如果boot loader链接地址出错,将会终止的第一条指令,然后去验证一下你的想法,改变boot/Makefrag里的链接地址,clean之后,重新编译,跟踪进入boot loader看看会发生什么(和你之前想的一样不一样?)。做完实验后,记得把链接地址改回来。
练习6:实模式与保护模式
Exercise 6. We can examine memory using GDB’s x command. The GDB manual has full details, but for now, it is enough to know that the command x/Nx ADDR prints N words of memory at ADDR. (Note that both ‘x’s in the command are lowercase.) Warning: The size of a word is not a universal standard. In GNU assembly, a word is two bytes (the ‘w’ in xorw, which stands for word, means 2 bytes).
Reset the machine (exit QEMU/GDB and start them again). Examine the 8 words of memory at 0x00100000 at the point the BIOS enters the boot loader, and then again at the point the boot loader enters the kernel. Why are they different? What is there at the second breakpoint? (You do not really need to use QEMU to answer this question. Just think.)
6.1部分主要是熟悉x命令,x/Nx ADDR,打印出ADDR出的N个字指令,一个字代表2字节。
6.2部分,当BIOS进入boot loader时,查看0x00100000处的8字指令,当boot loader进入kernel时,在查看一次0x00100000处的8字指令,为什么它们是不同的?第二个断点处是什么(指令)?(不需要QEMU就可以回答这个问题,好好想想。)
这个问题在做之前可以先想想,当BIOS进入boot loader的时候,处理器是实模式,因此0x00100000对应的是实模式下的地址,当boot loader进入kernel的时候,0x00100000对应的是保护模式下的地址,二者肯定是不同的。猜测第二个断点处的0x00100000处的指令是kernel的初始指令,因为kernel被加载到这个地方。
首先设置两个断点,分别是BIOS进入boot loader的地址0x7c00,和boot loader进入kernel的地址0x0010000c。
- 首先在结合obj文件中的boot.asm和kernel.asm以及kernel.ld查看入口位置。
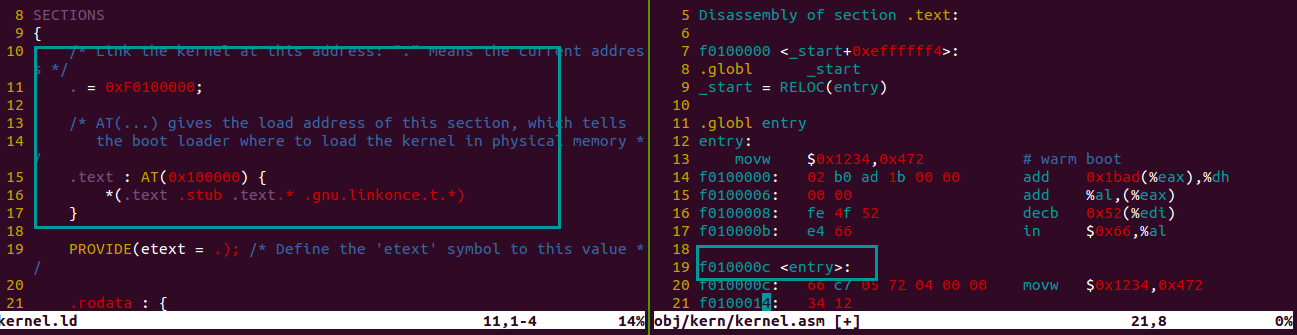
可以看到,boot loader进入kernel的入口地址是0x10000c(物理地址),另外可以在kernel.ld中看到,kernel的逻辑地址是f0100000,加载到的物理地址是0x10000,这里是手动转换的。 - 其次设置断点,执行,
先看第一个断点的结果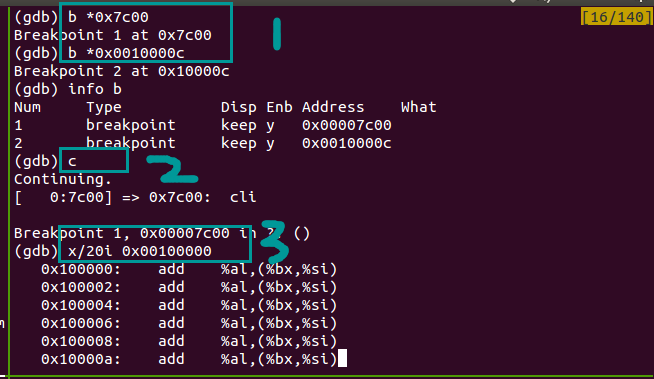
再看第二个断点的结果,上面窗口是gdb调试的结果,可以看到,这里对应的kernel入口的初始指令,验证了起初的猜想。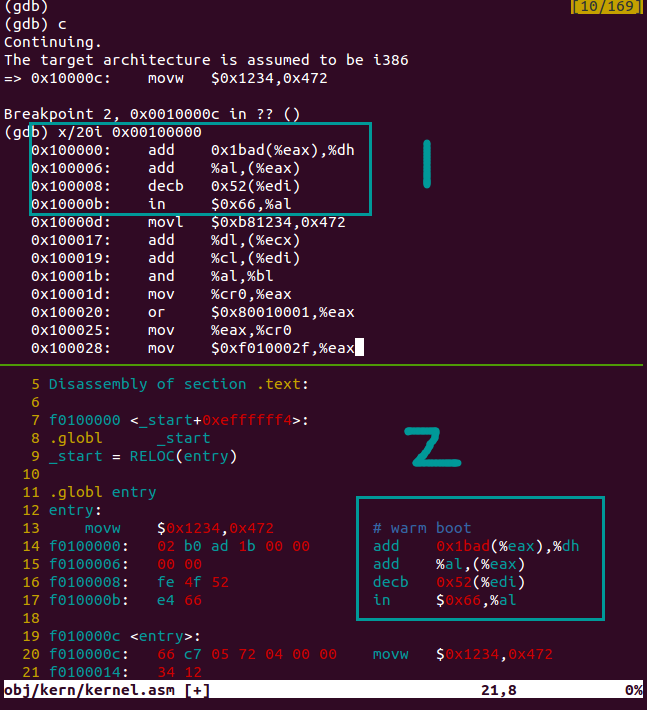
实验1.2总结:
- boot loader的主要功能
- 把处理器从实模式切换到保护模式
- 载入kernel